Showing posts with label DIY. Show all posts

Saturday, October 1, 2011

DIY - Check and Check!

I've been busy preparing for the wedding. As of today, we fly to the Philippines in 33 days. One of the things I am particularly proud of completing is the Ring Book and the Locket for the bouquet.

First the Ring Book. You may remember from this post, when I first picked up the book. Rather than being a single effort, the book became a team effort, and my two girls C & K put work into it. 

Here is the book closed. I taped up the sides since I painted the title on the spine over in gold. Despite, sensitive wall paint tape, even when I pulled it off, it took some of the cover off. I don't mind so much, I think it adds to the vintage look and feel.


I glued all the pages together so that it can only open to this page. C cut out the square for me, while K cut the felt piece and the ribbon. I did all the painting.


Again, it was the perfect page to choose. Look at all the references on the page!


Next is the locket. Here is the locket I bought from Etsy. It's a vintage piece which you can tell by some of the details.


Next, I scanned and changed the picture of my grandmothers to sepia. The picture on the left is my Grandma Lily, who recently passed away, on her wedding day. My other grandmother didn't have a picture as young, but this is a picture that included my grandfather, when they were still in the Philippines. 


Now, I don't have that many more crafty things to do. Mostly designing and paper things. But these will definitely add to our wedding's uniquness. Hooray!

Sunday, July 17, 2011

On the Road to the Ring Book

I got off a little early from work, so swung by the Toronto Public Library's used book store where they sell some withdrawn used books. I picked up this beauty for a dollar!


Different from most books, this had a leathery Red cover instead of a typical canvas one. The emblem on the cover has stars and an interesting design.


The spine, has a gold design, but the title in the blue we will be covering up.


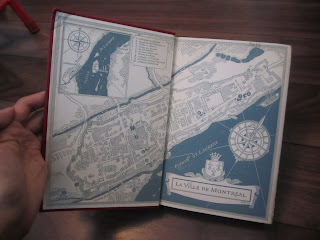
The inside cover has an old map of Montreal from what looks like the 17th Century. I thought it was cool since R and I met in Montreal.


Right in the middle of the book, I found a page where two characters talk about being in love and wanting to get married. Perfect page to pick as the ring page!

So now the task is to actually put it together. More updates when that happens!

Wednesday, May 25, 2011

Attempting the Details

Sometimes I wonder if by posting things about the wedding, I'm diminishing the surprise element? What do you think?

I love discussing it, and don’t have someone with me all the time to hear me ramble about my wedding plans. If I did, gawd, poor them! I feel like only other brides can really deal with your wedding ramble, and its only out of respect because you'll listen to theirs. Also, maybe it will be a source of ideas for some bride bouncing around the internet and reading other bridal blogs.

On the one hand, I feel like I'm getting rid of the element of surprise. But then again, I have 20 people attending my ceremony, who most, don’t even read this blog. So they're still going to be somewhat surprised, and those who can't make, it can bask in my vision.

Ceremony spoiler alert, for those that want to be surprised!

The ceremony is really coming together. We've so far started to paint the picture of what we want the scene to look like by discussing the type of arch, chairs and bench we want. We've booked a violinist. We've discussed an officiant, who hasn't been booked, but we could probably do that soon enoough. I've started an outline of the actual ceremony (more on that later) and asked one of my good friends of mine to help put the ceremony together…since he's very progressive and very well connected with his progressive Church, he'll be able to contribute in a big way. Now for some smaller ceremony and décor details.

We don't have any cute little boys to play ring bearer, so likely someone else will be bringing the rings. We decided to add to our ceremony a Ring Warming Ceremony, where we will pass our rings around at the beginning of the ceremony so that our guests can say a little prayer or blessing for us. We're so lucky that a few people will be making the trip to our wedding, and we want to include them in the ceremony.

But rings are small, and we're going to be on sand, so we want it to be attached to something someone can keep an eye on, and can't be dropped very easily. So we thought of the Ring Book. Rather than having a little tacky pillow cushion, we are going to use a book with a secret compartment that will hold the rings.


Off weddingbee.com, I found this great tutorial on how to make one. Martha Stewart's got one too, but I'm going to support the non-corporate-brand of making a Ring Bearer Book. I really like the vintage feel of the ring book here.

R loves the idea, but we were also thinking of making the book significant too. We came up with Carlos Bulosan's America Is In The Heart. A well written, honest bibliographical account of struggle of migrants in agricultural work in the U.S. during the 1930s. He also talks about labor politics and the attacks on unionists. He describes horrific discrimination, starvation and ultimate struggle. Anyways, its our kinda story.

Unfortunately, we'll have to cut up the book to make the Ring Book. But we were hoping that we would stop and highlight a really deep thought provoking line, that people will see when they open it to see our rings. Even more unfortunate, is our inability to find a copy of this book in Hardcopy. Honestly, no one sells it or appears to have ever published it. I looked online at Amazon, and some other places, but also scowered Kijiji and Ebay to see if someone internationally wants to part with it…. For under $40.

So, our options is are (in order of easiest, to hardest, which also happens to be worst to best case scenario)
- find another generic book that has absolutely no significance but is pretty.
- look for a book binder who can magically make a paperback to a hardcover. (As I wrote, this I googled a bookbinder in Toronto, called them and found out that they can do it - after checking the book first - but it cost $60, and they cannot emboss images, just text. So in addition to actually buying the book $20, we're looking at almost $100 to destroy the book)
- look through my contacts to find that business card of Carlos Bulosan's editor who I met in 2007. Maybe he has an extra hard copy he can sell me?

The last option would be to figure out how to make this a paperback into a hardcopy. I'm sure someone crafty can help me with this…
Ugh. Gotta figure out our options with this one!

Tuesday, April 12, 2011

Invites (almost) done!

There are times that I really wish my MOH was in town. My MOH is my best friend and she is away doing her masters. Anyways, putting these things together makes me really wish she was here because I just needed the help. I don't have regular girlfriends in my life that I see all the time, that a day putting these together would have been fine. I see my closest girlfriends, once or twice a month, and we have a nice dinner and talk because we have so much to catch up on. Anyways, it would have been nice to have had some help. I guess that's why R has been pitching in so much to finish these:

First thing in the morning, still wearing his pag-bahay, cutting.

First a shot of the expensive decorative paper:
Oh la la.

And la piece de la resistance, a completed set!


And here are the rest of the pieces also:


I also made mailing and address labels for the chocolate envelopes...but I didn't take a picture yet. Anyways, now to put the rest together!

Wednesday, April 6, 2011

Wandering Minds...New Ideas?

The invitations are taking a little longer to put together. I guess, because there's so many detailed steps:
- print the invitations
- cut the invitations
- round the corners of the invitations, decorative paper and back layer
- print the note card
- cut the note card
- cut the note card back layer
- round the corners of the note and the back layer
- glue the decorative paper to the back layer
- glue the invitation
- glue the note card to its back layer
- print the address labels
- attach to the envelopes
- punch the belly band attachment
- take the band photo
- print the belly band photo
- cut the photo
- cut the ribbon
- create the belly band

Some things that I didn't cross out are half done, but the majority... isn't. I'm home from work today because I had some minor surgery, and had planned to do some of the work, however, I underestimated how much roller adhesive I needed. I bought 1 with 4 refills, and used it all on attaching the decorative paper to the back layer. I did do about 15 complete invitations - attaching the invitation to the decorative and back layer, but I do not have enough roller to do any more. So we will have to wait until Sunday, when I can go visit Michael's, again.


Anyways, without much to do or anyone to discuss the wedding with, I found a website called Best Wedding Destination and have been looking at the forum for DIY ideas, and reading some other people's threads. One of the threads I found talked about centre pieces, and although I had some ideas on what I wanted to do, I'm thinking of something else now.

This is what I was thinking at first:


A mix of white and green flowers, likely something native to the Philippines like the Sampaguita and Dama de Noche.

With the flowers, some interesting wood pieces and candles, to highlight the browns and native crafts.

And this is what I am thinking of adding this large palm center piece:


Or maybe...I can do some tables the large tall centre piece, while others with short? So I guess, because I'm in a place where I can't do much, than my mind is wandering and thinking of some new ideas. Wonder what R will thing?

Sunday, March 27, 2011

Invitation Drafts

I decided not to do overtime this weekend, partly because I was exhausted, but mostly because Isabela's been experiencing some separation anxiety and is coming down with a cold. Anyways, some free time at home (after a trip to Michael's), means I got to put together some drafts for the invitations.

Initially, I was waiting until I got InDesign from my brother, but the mail was not good to us, so I decided to make them in Word. Seriously. They turned out really well though. But I'll have to recreate it on InDesign anyways, because we want to make a version appropriate to email as an evite as well.

We also had a printer mishap. The awesome Epson all-in-one printer I've had throughout University, essentially died, after we spent $75 on ink. After spending most of the weekend trying to fix it (because I needed to print a 50% off coupon for Michaels), we decided to buy a new printer. So the invitation expenses are sort of going through the roof because of these things. In addition, remember how I mentioned in my last post using oneheartweddings for clipart? Well if you don't cancel your free trial, they automatically charge you $39US and subscribe you for a year. Take a guess how I figured that one out.

Anyways, despite those things, we decided to still go forward and DIY our invitations. We figured if we paid for invitations, we'd have to pay to get a matching RSVP card, and then programs, and other stationary.

Our expenses so far from just these drafts have been:

  1. Around $30 for different decorative paper, the linen paper and 5x7 cuts of the chocolate and bronze paper, plus a rounded corner punch.
  2. $39 for the wedding clipart website that I didn't really want to subscribe to.
  3. $75 for ink for our old printer. (I'm going to put up the unopened packs up for sale on Kijiji)
  4. $50 for a new printer.
  5. $55 for a paper trimmer,  pearl embellishments, a square punch and ribbon.
For a total of $249. Booooo. Way too much before the actual invitations. Hopefully, we'll cut it back with selling the ink on Kijiji.


Anyways, we were trying to figure out a few things with these drafts:
  • Chocolate or Bronze back layer
  • Dark green leaf design or the outlined one
  • a more ornamental decorative paper or the leaf design.


Good thing we tested everything, because we ended up choosing a different combination than we had initially thought we wanted. I won't say what we decided, so you'll just have to wait until I show the finished invites.

If you're wondering. I downloaded the fonts for free from DaFont. The main text is Day Roman, while our names are in Shit Happens. I also got the image from OneHeartWeddings.

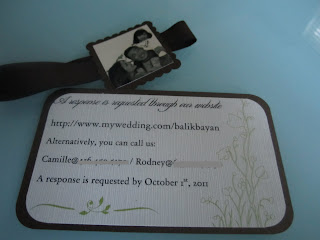
I also wanted to do an RSVP card, that speaks to our website where people can respond to our invitation, as well as have access to other information. So I did a smaller card as well on the linen paper, using the same fonts and another image from the Oneheartweddings (gotta get my moneys worth!).

.
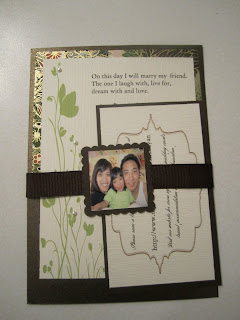
Finally, to bring it all together, we needed a band to literally hold it all together. I had danced with a few ideas, but after requesting a DIY from pink loves chocolate, I got the idea of using a ribbon. Instead of a monogram,  I decided we could bring it together using a picture. Note, this ISN'T the picture we're going to use. I just took it 10 minutes before making our drafts, so I can see if it was seriously, super tacky or not. We'll probably do a nicer one in black and white or sepia, but Rodney does like the idea. Especially, since we'll be mailing the invitations to his family in the Philippines, who don't have many pictures of us and might really like it.


So theres a little bit of tweaking that needs to be done still, and a new family photo for our belly band. But, I think we got a good plan to make our DIY invitations. I'm really, super excited!!

Tuesday, March 22, 2011

The begining of my DIY

R and I had our paper date at The Paper Place and I picked up some good paper to do some of our tests on. We decided to do a decorative paper layer after looking at some of the amazing Japanese paper.
Here's what we picked up:


It's hard to tell from the picture, but we picked up two types of 5 x 7 types, a chocolate and a bronze (a metallic paper), we have four different types of decorative paper to try out, and we settled on a cream coloured linen paper. Linen paper has textured lines that go across from it. So we plan to print the invitation on the cream paper, then have two layers under, with the dark brown as the bottom layer.

I also bought a paper punch out that will round the corners of our paper.

I also just had lunch with my friend G, who is also getting married. Man, bride dates are awesome for exchanging ideas! She told me about a place in Markham called Paperland, which has an unfortunately horrible website (which she warned me about), but apparently a good selection and at dirt cheap. So maybe we will go to this other place and find the linen paper and the chocolate paper for cheap, and get the fancy decorative Japanese paper from paper place.

I'm sooo excited. Drooollll... dreaming of DIY.

Thursday, March 17, 2011

Invitations

A very good friend of mine had offered to help design my invitations. She does not think she will be able to attend the wedding but still really wants to be a part of it. I adore her for that. She's not a graphic designer but has made some awesome posters and flyers for organizing work.

So after a few weeks of trying to figure out how to do it and me, sort of, rejecting her drafts, we/I have decided to design them myself with her help. It's a little different, in that I sort of figure out exactly what I want (images, fonts, concept as a whole) and then she will do some of the more technical stuff. She has also offered to pay for half the cost of the invites, but I really do not thing that's necessary.

Anyways, this means, I have been staring at website of paper products for days and days. Let me tell you, I hate it, but LOVE IT. I am getting really pumped up about crafting it up!

Tonight I have a paper date with the FH (future hubby) to literally look at paper at a place literally called The Paper Place. The last time I visited, they had a lot of great ideas for invitations, and although I'm leaning towards a 5x7 layered card, I may be inspired to do something else.


I also am currently using a website called One Heart Wedding to get clipart, background and inspiration. I essentially was able to make my draft for free because they allow you a free trial and make 2 free downloads. For unlimited access for one year its $32, which I may decide to do because if this invitation goes well, then I will continue to keep the same theme with other upcoming stationary; I'm thinking the ceremony program and menu cards mostly.


Due to the size of the wedding and the time I have, I really want to take an intimate hand at imagining and creating the details. I did show my MOH my first draft and she told me she loved everything about it and was more emotional that I was prepared for. LOL oh, Cams.

More updates as I move along!